
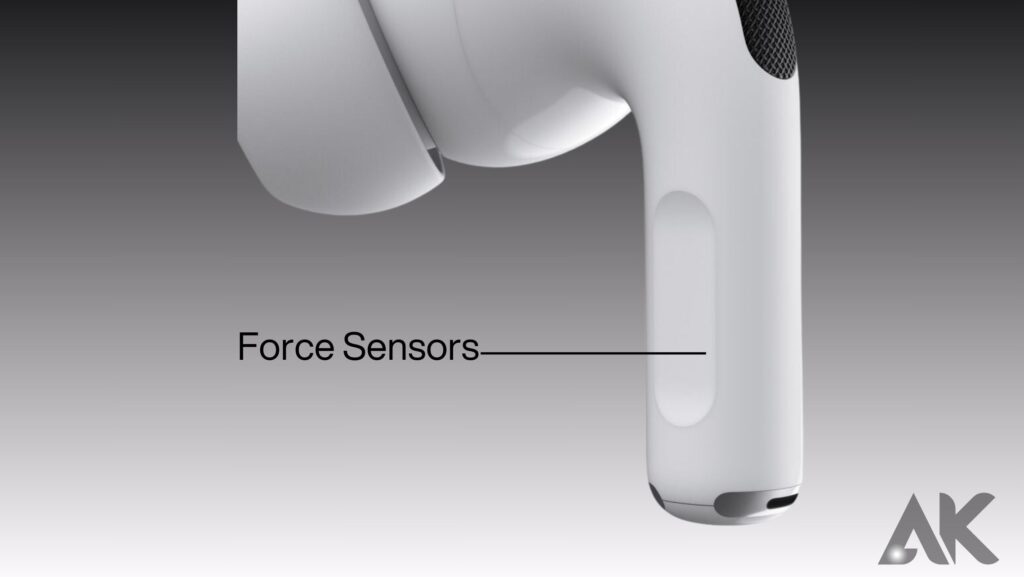
The second generation of Apple’s well-known active noise-canceling headphones features a number of upgrades. Along with the force sensor controls already in place, this also contains features like adaptive transparency, 2x greater noise cancellation, an updated charging case with Find My Tracking, a swiping volume control, a speaker, and a lanyard loop.
Check out our comprehensive tutorials for a thorough examination of how to customize the AirPods Pro force sensors and how they differ from the other AirPods in the lineup:
Your AirPods can do so much more.
Nothing makes me happier than double-tapping one of my AirPods while out for a walk to skip a song. Life is about the little things. The AirPods’ default tap option allows you to skip ahead one song, but there may have been times when you wished to tap to go back one song instead. You can alter those AirPods settings, and we provide comprehensive instructions on how to do that.
How to change the settings on your first- or second-generation AirPods

Depending on the type of AirPods you own, you can experiment with various settings. Old-style AirPods users:
1. Remove your AirPods from their case and place them in your ears or next to your phone.
2. Navigate to Settings, select Bluetooth, and select your AirPods from the list of connected devices.
3. When you click on the tiny “i” icon next to your AirPods, all of the settings you can change should appear.
Customization options:
- Name: Click or tap “Name” and enter the name you want to give your AirPods.
- Settings for double-tap: Tap on “Left” or “Right” to choose which AirPod will double-tape. You can choose to turn off double-tap, activate Siri, play or pause music, go to the next or previous track, or any combination of these.
- You can turn on or off automatic ear detection so that your AirPods will know when they are in your ears. When you insert your AirPods, if they are turned on, they will immediately start playing anything on your phone and stop playing it when you remove one or both of the pods.
- Tap “Microphone” to select which AirPods microphone will be used to record sound for phone calls. If you set it to “Automatic,” the microphone will switch if you accidentally press a button.
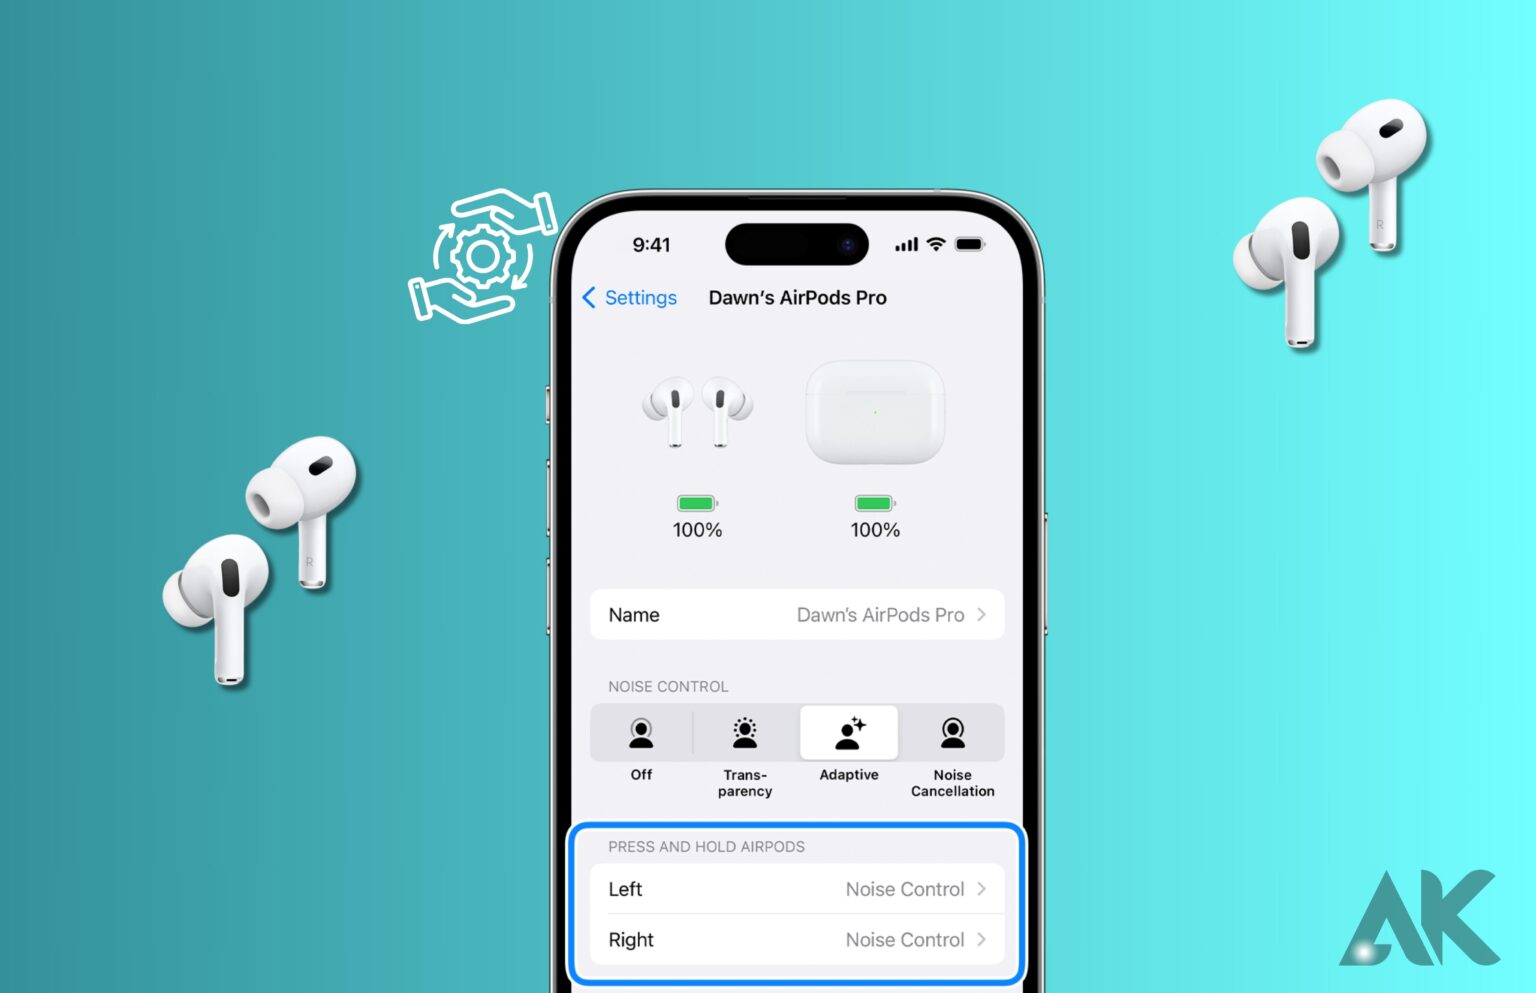
Turning to the left and right Force Sensors for AirPods Pro/AirPods 3:
- Open the Settings app on your iPhone.
- To use them, tap the top of your AirPods case while it is close to your iPhone.
- Choose left or right under “Press and Hold AirPods.
- You can choose what the AirPod Force Sensor does.
- Additionally, you have the option of adding “off” to the Noise Control controls.
You may also modify the behavior of the microphones in your AirPods Pro at the bottom of this screen.
Change the AirPods’ press speed and duration by:

- Go to Settings and then Accessibility.
- Tap AirPods with a downward swipe.
- Alternately, select something else from the default to change your press speed and press and hold time.
- By turning on noise cancellation at the bottom of this settings screen, you can also use one AirPod to do so.
Here are all the controls available with AirPods Pro, in case you’re not already familiar with them:
- Pause and play audio: A stem is pressed. Press it once more to restart playback.
- Play the following song: Press the stem twice.
- Play the prior song. Press the stem three times.
- Answer the phone by pressing the stem when it rings.
- Boost the volume: Lightly move the stem up or down (2nd generation only).
- Alternate between transparent mode and noise cancellation. When you press and hold the stem of either of your AirPods, you can program them to carry out this function.
- Turn on Siri: When you press and hold the stem of either of your AirPods, you can program them to carry out this function. Install Siri.
Here are the AirPods 3’s standard controls:
- Pause and play audio. Once, press the force sensor. Press it once more to restart playback.
- Play the following song: Press the Force Sensor twice.
- Press the force sensor three times to play the preceding track.
- Take a call: Press the force sensor to answer the phone when it rings.
- Turn on Siri: Questions, app control, and more may be done by pressing and holding the Force Sensor.
How to customize your AirPods Max settings

The procedure for renaming your AirPods Max is the same as described above, but since they’re brand new, they provide more customization choices. The completely distinct form factor, digital crown, and buttons are what cause the discrepancies.
1. Remove the Smart Case from your AirPods Max while holding your phone nearby.
2. Navigate to Settings, select Bluetooth, and select your AirPods Max from the list of connected devices.
3. Select the small “i” icon next to your AirPods Max to access all of the settings you can change.
Customization options:
- When you click this button, you can select which sound mode you want to use if your device is running iOS 14.3 or later.
- Automatic Head Detection: Like Ear Detection for the older AirPods models, you may turn this feature on or off so that your AirPods Max will know when you are wearing them and play the right music.
- Rotation Direction: By tapping on “Digital Crown,” you may select the direction in which you want to turn your digital crown to change the volume.
You can even tap “Forget This Device” at the very bottom of any AirPods model to totally remove the pairing information from your phone. And it’s not the end of the world if you unintentionally tap this. Similar to how you would replace a new pair of AirPods, you can quickly repair them. You might even have the impression that you just got a brand-new pair as a result!
Conclusion
AirPods can be customized to suit different models, allowing users to customize their features and actions. For first-generation AirPods, users can open their AirPods case near their phone or put them in their ears. They can then go to their Settings app, tap Bluetooth, and find their AirPods among the available devices. The settings can be customized by typing in a name, double-tap settings, automatic ear detection, microphone, and AirPods Pro/AirPods 3 Force Sensors.
iPhone users can change the left and right AirPod Force Sensors, press speed and duration, and enable noise cancellation with one AirPod. AirPods Pro controls include playing and pausing audio, playing the next track, playing the previous track, answering a call, adjusting volume, switching between noise cancellation and transparency mode, and activating Siri.
AirPods Max users can customize their settings by taking their AirPods Max out of the Smart Case, going to their Settings app, tapping Bluetooth, and finding their AirPods Max among the available devices. They can choose the sound control button, automatic head detection, and rotation direction. For all models of AirPods, users can tap “Forget This Device” to erase their pairing data from their phone. If accidentally tapped, users can easily repair their AirPods, making them feel like new ones.
FAQS
How do I control my AirPods?
You can accomplish any of the following with the touch control on the stem of both AirPods Pro (2nd generation):
Pause and play audio: A stem is pressed.
Play the next song: Twice press the stem.
Play the prior song. Press the stem three times.
Answer the phone by pressing the stem when it rings.
Can I control the volume on AirPods?
You can change the volume when using AirPods or AirPods Pro by using the linked device (such as an iPhone or Apple Watch). Siri may be used to change the volume as well. Using the touch control on the stem of your AirPods Pro (2nd generation), you can directly adjust the volume.
How do I turn on noise cancellation on AirPods?
An AirPod will chime if you press and hold the force sensor on the stem. Press and hold the force sensor on either AirPod while wearing both to choose between Active Noise Cancellation, Transparency mode, and Off. You may also use adaptive audio with AirPods Pro (second generation).
Are AirPods waterproof?
The third-generation AirPods Pro are not waterproof or sweatproof, but they are sweat- and water-resistant. They are not intended for use when swimming or taking a shower.