
How to change VPN settings on Windows 10 Have you ever had trouble modifying your VPN settings? Have you tried to change your VPN configuration but become confused by the Windows 10 settings menu? For improved security, quicker connections, or access to region-specific material, many users wish to modify their VPN settings, but this process might be unclear. Understanding [how to modify VPN settings on Windows 10] will improve the efficiency and smoothness of your experience, whether you need to update server information, change VPN protocols, or troubleshoot connectivity issues.
What You Will Learn in This Guide
By following this guide, you will learn [how to change VPN settings on Windows 10] effectively. We will explain:
- How to access and modify VPN settings in Windows 10.
- How to change VPN protocols, server addresses, and authentication details.
- Troubleshooting tips to fix common VPN issues.
Understanding VPN Settings on Windows 10
Users may quickly configure and adjust their VPN settings thanks to Windows 10’s built-in support for VPN connections. Understanding [how to adjust VPN settings on Windows 10] will help you keep a safe and dependable connection whether you’re using a free VPN service, a business network, or a premium membership. The protocols, authentication techniques, and DNS settings that are available in Windows 10’s VPN settings affect how your connection works.
Depending on what your VPN provider recommends, you might need to switch between protocols while configuring a VPN, such as PPTP, L2TP/IPsec, or OpenVPN. In order to increase internet speeds or prevent ISP tracking, some customers might also wish to modify their DNS settings. Additionally, while switching VPN providers or resolving connectivity issues, it may be required to change server addresses and login credentials. You can make sure your VPN operates well and offers the best security and speed by learning [how to adjust VPN settings on Windows 10].
Why Changing VPN Settings is Important
Usability, privacy, and security are all impacted by VPN settings. Better performance and protection are guaranteed when they are kept optimized.
- Better Privacy Protection—Changing DNS settings and enabling leak protection prevents ISPs and hackers from tracking your activity.
- Optimized Speed—Selecting the right server or protocol, or enabling split tunneling can improve browsing and streaming performance.
- Access to Blocked Content—Adjusting VPN settings helps bypass censorship and geo-restrictions in certain regions.
- Stronger Security—Configuring encryption levels and enabling kill switches can prevent data leaks in case of VPN disconnection.
Regularly reviewing and adjusting VPN settings helps maintain a seamless and secure internet experience in Windows 10.
VPN Settings Breakdown: What They Do and How to Use Them
| Feature | What It Does | How You Can Use It |
|---|---|---|
| VPN Protocol | Determines how your VPN connection works. | Choose between PPTP, L2TP, SSTP, or IKEv2 for better security and speed. |
| Server Address | Directs your traffic through a specific server. | Enter the correct server details from your VPN provider. |
| Authentication Method | Secures your VPN connection. | Choose password, certificate, or smart card authentication. |
| DNS Settings | Manages how websites are resolved. | Change to a private DNS for better privacy and performance. |
| Split Tunneling | Allows selected apps to use VPN while others use a direct connection. | Enable this feature if you need access to local and VPN networks at the same time. |
How to Access and Modify VPN Settings in Windows 10
Windows 10 allows users to set up and customize VPN connections directly from the settings menu. Here’s how you can access and modify these settings:
- Open Windows Settings— Press Win + I on your keyboard to open the Settings menu.
- Go to VPN Settings—Click on Network & Internet, then select VPN from the left sidebar.
- Select Your VPN Connection—You will see a list of configured VPN connections. Click on the VPN you want to modify.
- Modify Connection Settings—Click on Advanced options to access additional settings, such as automatic reconnection, proxy settings, and split tunneling.
- Change Authentication Type—If you need to change login credentials, select the authentication method (username/password, certificate, or smart card).
- Save and Apply Changes—Once you’ve modified the required settings, click Save and reconnect to check if the changes take effect.
How to Change VPN Protocols, Server Addresses, and Authentication Details
Different VPN services offer different protocols for enhanced security and performance. If you need to update these settings:
- Changing VPN Protocols— Some VPNs let you switch between OpenVPN, IKEv2, PPTP, L2TP/IPsec, or WireGuard. If your VPN provider allows protocol changes, you can modify them from the VPN settings in your provider’s app or manually in Windows VPN settings.
- Updating Server Addresses—If you need to change the VPN server location, go to Network & Internet > VPN, select your VPN, click Edit, and enter the new server address provided by your VPN service.
- Modifying Authentication Details—If your VPN requires different login credentials, go to the VPN settings, select your connection, and update the username, password, or certificate information.
How to Change VPN Settings on Windows 10
Changing VPN settings in Windows 10 requires a few steps, but once you know the process, it becomes easy to manage. Below are the simple instructions to modify your VPN configuration for better security, faster speeds, or improved accessibility.
Step 1: Open VPN Settings
- Click the Start button and select Settings (the gear icon).
- In the Settings window, click on Network & Internet.
- From the left-hand menu, select VPN.
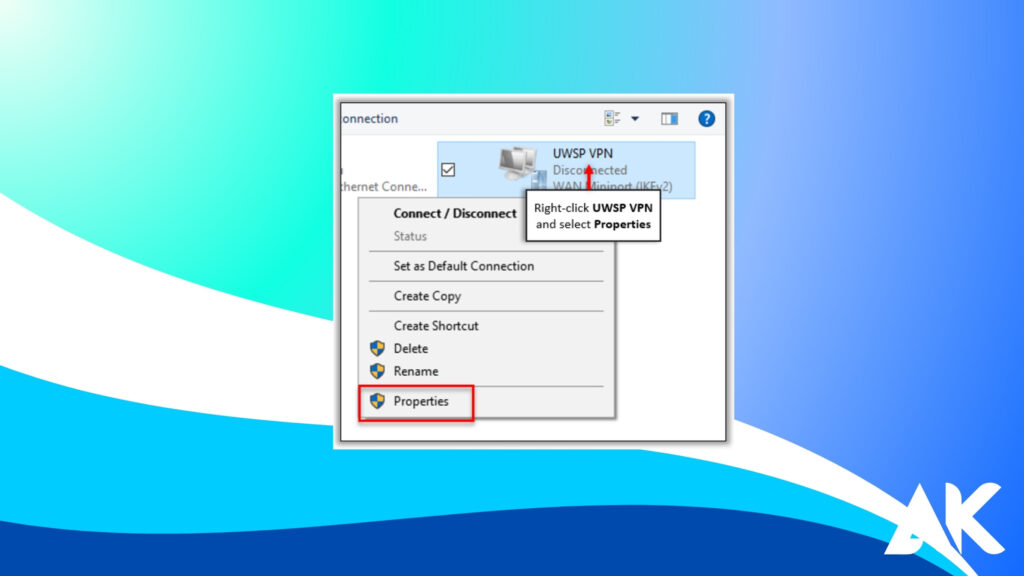
Step 2: Access Existing VPN Connections
- Under the “VPN” section, you’ll see a list of your saved VPN connections.
- Click on the VPN connection you want to change, then select Advanced Options.
Step 3: Edit VPN Settings
- Click the Edit button to change basic settings, such as:
- Connection Name: Rename the VPN connection.
- Server Name or Address: Update the server address provided by your VPN service.
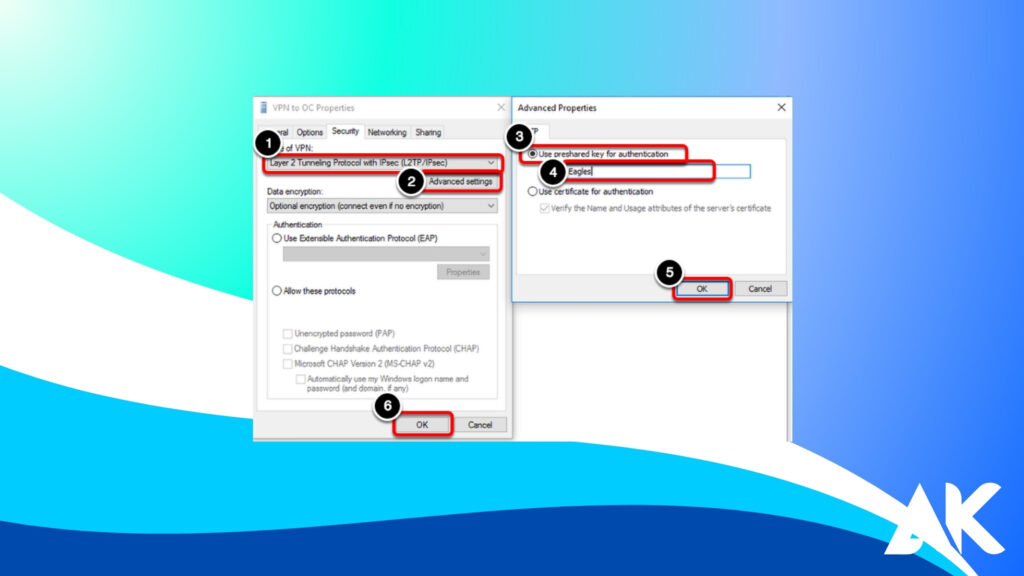
- To change protocols, scroll down to VPN type and select from:
- Automatic (default)
- PPTP (Point-to-Point Tunneling Protocol)
- L2TP/IPsec with certificate
- SSTP (Secure Socket Tunneling Protocol)
- IKEv2 (Internet Key Exchange Version 2)
Step 4: Adjust Authentication and Proxy Settings
- Under Sign-in info, update your username and password if needed.
- To configure proxy settings, scroll down to Proxy settings and choose whether to automatically detect parameters or enter them manually.
Step 5: Save and Test Changes
- Click Save once you’ve made the necessary changes.
- Go back to the VPN connection list and click Connect to ensure the new settings work properly.
Troubleshooting Tips for Common VPN Issues
If you connect connection problems with your VPN, try these solutions:
- Restart the VPN Connection—Disconnect and reconnect the VPN from the settings menu.
- Check Internet Connectivity—Ensure your internet is working before connecting to the VPN.
- Update VPN Software—If you’re using a third-party VPN, update it to the latest version.
- Change VPN Server Location—Some servers might be overloaded; switching to another can improve performance.
- Disable Firewall or Antivirus Temporarily— Some security programs may block VPN connections. Try disabling them and reconnecting.
By following these steps, you can easily access, modify, and troubleshoot VPN settings in Windows 10 to ensure a secure and stable connection.
How to Delete or Reset VPN Settings in Windows 10
If your VPN is not working properly or you need a fresh setup, deleting or resetting VPN settings in Windows 10 can help. Over time, VPN configurations may become outdated or cause connectivity issues. Resetting them ensures a clean connection.
Steps to Delete or Reset VPN Settings:
- Open Settings— Press Windows + I, go to Network & Internet, and select VPN.
- Remove VPN—Click on your VPN connection and select Remove.
- Delete VPN Adapter— Open Device Manager, find your VPN under Network Adapters, right-click, and select Uninstall.
- Reset Network Settings— Go to Settings > Network & Internet > Status, and click Network reset to restore default configurations.
Resetting VPN settings can fix slow speeds, connection failures, and security issues, allowing for a smoother experience.
How to Set Up Split Tunneling in Windows 10 VPN
Split tunneling allows you to route some internet traffic through your VPN while keeping other traffic on your local network. This is useful for accessing local network devices while using a VPN for specific tasks like streaming or secure browsing.
Steps to Enable Split Tunneling:
- Open PowerShell as Admin— Press Windows + X, select Windows PowerShell (Admin).
- Find Your VPN Name—Type Get-VPNConnection and note your VPN’s name.
Enable Split Tunneling—Use this command:
powershell
CopyEdit
Set-VPNConnection -Name “YourVPNName” -SplitTunneling $True
- Confirm Changes—Type Get-VPNConnection again to verify split tunneling is enabled.
This setup helps balance security and performance by allowing selective use of your VPN connection.
Common Reasons to Modify VPN Settings
Many users modify VPN settings to enhance speed, privacy, and access to restricted content. Here are some common reasons why changes may be needed:
- Improving Speed and Performance—Adjusting DNS settings or changing VPN servers can reduce latency and improve browsing speeds.
- Fixing Connection Issues—If your VPN disconnects frequently, modifying protocol settings (like switching from UDP to TCP) can help.
- Bypassing Geo-Restrictions— Changing server locations or enabling split tunneling can provide better access to global content.
- Enhancing Security—Using custom encryption settings or enabling a kill switch prevents data leaks during VPN failures.
Modifying VPN settings ensures a stable, secure, and efficient online experience based on your specific needs.
Conclusion
You may quickly adjust your VPN settings for increased security, quicker speeds, and increased dependability now that you know [how to change VPN settings on Windows 10]. You can maximize your experience by controlling your VPN settings, whether you need to switch protocols, modify server addresses, or troubleshoot connectivity issues.
FAQs
In Windows 10, how can I reset my VPN settings?
Navigate to Settings > Network & Internet > VPN, pick your VPN, and then click Remove to reset the settings. Resetting network settings can also be done by selecting Network Reset under Settings > Network & Internet > Status.
Why is Windows 10 preventing my VPN from connecting?
Incorrect configurations, out-of-date drivers, or network limitations could be preventing your VPN from connecting. To fix the problem, try updating your VPN client, changing VPN protocols, or examining firewall settings.
How can I modify my Windows 10 VPN’s DNS settings?
Select Internet Protocol Version 4 (TCP/IPv4) by right-clicking your VPN, selecting Properties, and then going to Control Panel > Network and Sharing Center > Change adapter settings. Put the DNS servers you want to use under Make use of the DNS server addresses listed below.
In Windows 10, how can I remove a VPN profile?
Click Remove after choosing the VPN connection under Settings > Network & Internet > VPN. The VPN adapter can also be removed from Device Manager’s Network Adapters section.