
Want to connect to a VPN on Windows 10 but not sure how? It’s actually simple! A VPN (Virtual Private Network) keeps your internet activity private and secure, whether you’re working remotely or accessing restricted content.
This guide will walk you through how to connect to VPN on Windows 10 in just five easy steps. Whether you’re using a built-in VPN client or a third-party service, we’ve got you covered. You’ll learn how to set up a VPN, enter your credentials, and connect safely in minutes.
By the end of this blog, you’ll have a secure connection and enhanced privacy while browsing. Ready to get started? Let’s dive in!
Why Use a VPN on Windows 10?
Before we jump into the setup, let’s look at why you should use a VPN:
- Enhanced Security – Encrypts your data and protects against hackers.
- Privacy Protection – Hides your IP address from websites and third parties.
- Access Restricted Content – Bypass geo-restrictions for streaming or work.
- Safe Public Wi-Fi Use – Keeps your information secure on public networks.
Now that you know the benefits, let’s set up your VPN in five easy steps!
How to Connect to VPN on Windows 10: 5 Easy Steps

Step 1: Choose a VPN Service
The first step is to select a reliable VPN provider. You have two options:
1. Use a Built-in VPN (Manual Setup)
Windows 10 allows you to manually configure a VPN connection if you have the server details from your employer or a VPN service.
2. Use a Third-Party VPN App
Most VPN providers (like NordVPN, ExpressVPN, or CyberGhost) offer apps that make connection simple.
Recommended Free & Paid VPNs:
| VPN Provider | Free Plan | Paid Plan | Security Features |
|---|---|---|---|
| NordVPN | No | Yes | AES-256 Encryption, No-Logs |
| ExpressVPN | No | Yes | Fast Speed, Strong Security |
| CyberGhost | No | Yes | Easy-to-Use Interface |
| ProtonVPN | Yes | Yes | Free with No Data Limit |
| Windscribe | Yes | Yes | Free 10GB Monthly Data |
Choose a VPN service based on your budget and security needs.
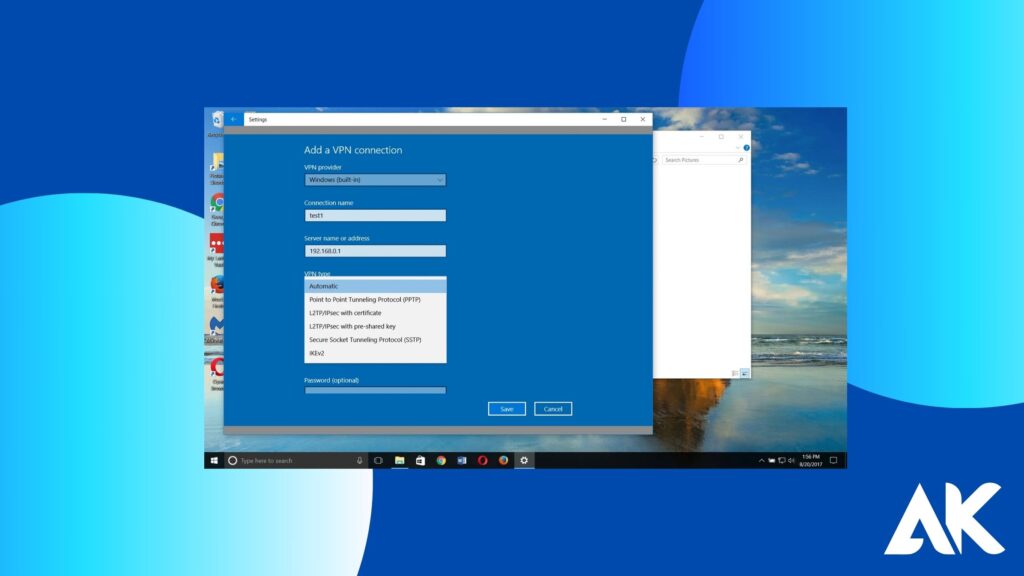
Step 2: Add a VPN Connection in Windows 10
If you are using Windows 10’s built-in VPN client, follow these steps:
- Click the Start Menu and open Settings.
- Go to Network & Internet > VPN.
- Click Add a VPN Connection.
- Fill in the details:
- VPN Provider: Windows (built-in)
- Connection Name: Any name (e.g., “My Work VPN”)
- Server Address: Provided by your VPN service
- VPN Type: Choose Automatic
- Sign-in Info: Username and Password
- Click Save to store your VPN details.
Now, your VPN is ready to use!
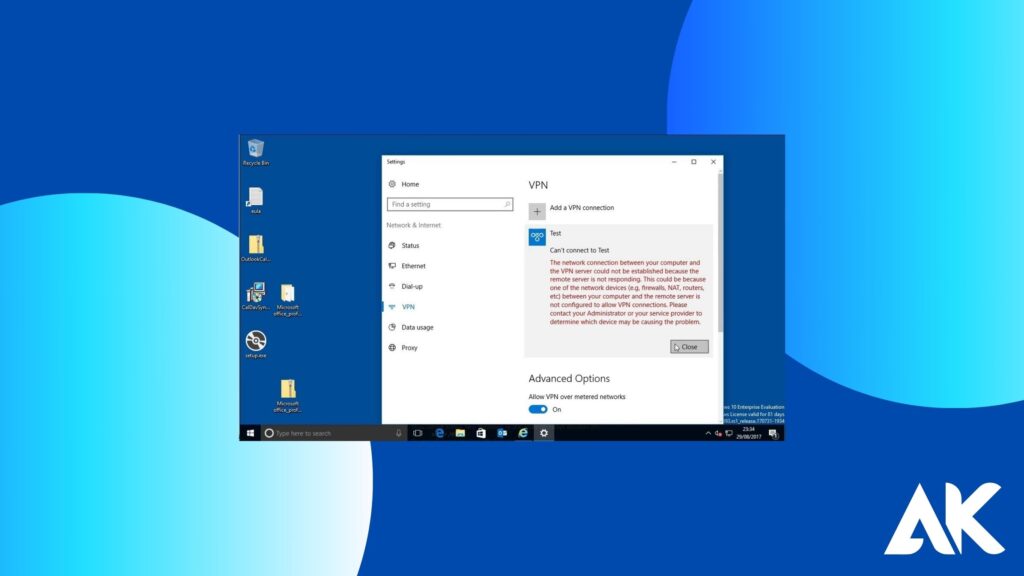
Step 3: Connect to the VPN
Once the VPN is set up, you can easily connect with these steps:
- Go to Settings > Network & Internet > VPN.
- Click on your VPN connection and hit Connect.
- Enter your username and password, if required.
- Wait for the status to change to Connected.
Now, your internet traffic is encrypted, and you’re securely connected!
Step 4: Configure VPN Settings for Better Security
To ensure optimal security and performance, adjust these settings:
- Enable VPN Kill Switch (Prevents data leaks if VPN disconnects).
- Use a Secure Protocol (Choose OpenVPN or WireGuard for better encryption).
- Enable Split Tunneling (Allows you to choose which apps use the VPN).
These settings will help improve your VPN experience.
Step 5: Test Your VPN Connection
Once connected, it’s important to check if your VPN is working properly:
✅ Check Your IP Address:
- Visit WhatIsMyIP before and after connecting.
- If the IP changes, your VPN is working!
✅ Test for DNS Leaks:
- Use DNSLeakTest to confirm your VPN isn’t leaking data.
✅ Check Connection Speed:
- Use SpeedTest to ensure the VPN doesn’t slow you down too much.
If everything looks good, you’re all set!
Common VPN Connection Issues & Fixes
Even after following the steps, you might face connection problems. Here’s how to fix them:
| Issue | Solution |
|---|---|
| VPN Not Connecting | Restart your PC and try again |
| Slow Internet Speed | Switch to a different VPN server |
| VPN Keeps Disconnecting | Enable “Reconnect Automatically” |
| Websites Block VPN | Use Obfuscated Servers or change protocols |
If problems persist, contact your VPN provider’s customer support.
Final Thoughts
Now you know how to connect to VPN on Windows 10 in just five easy steps. A VPN is a must-have for security, privacy, and unrestricted access to the internet.
If you haven’t already, choose a reliable VPN provider, set up your connection, and enjoy safe browsing!
Need help? Drop your questions in the comments below! 🚀
FAQs
Q1. How to connect to VPN on Windows 10 without an app?
A. To connect without an app, go to Settings > Network & Internet > VPN, click Add a VPN connection, enter your server details, and save. Then, select your VPN and click Connect.
Q2. Why is my VPN not working on Windows 10?
A. If your VPN isn’t working, try restarting your PC, switching VPN servers, updating your VPN software, or checking your internet connection. You can also change the VPN protocol for better compatibility.
Q3. Is it safe to use a free VPN on Windows 10?
A. Free VPNs can work, but they often have data limits, slower speeds, and weaker security. For better protection and performance, use a trusted paid VPN like NordVPN or ExpressVPN.