
Many problems are being experienced by Windows 10 users who recently switched to Follow our advice to quickly fix Windows 11 wifi that keeps disconnecting if you are also experiencing this problem. Following the release of our helpful article on how to resolve Windows 11’s no sound problem, we are now receiving reports from a large number of consumers who are experiencing frequent WiFi disconnections on their windows 11 computers.
WiFi never reconnects; it keeps disconnecting even when it is within range of the network. Follow our advice to quickly fix WiFi disconnections on your Windows 11 PC if you are also experiencing this problem. We’ve covered both simple and sophisticated ways to troubleshoot WiFi issues. With that said, let’s get started with the instructions.
We’ve covered ten possible solutions in this article for fixing Windows 11’s frequent WiFi disconnections. This article contains all the remedies, from the basic ones like making sure airplane mode is off to advanced ones like updating drivers. To choose the most suitable choice for you, expand the table below and click on it.
Turn On/ Off Airplane Mode
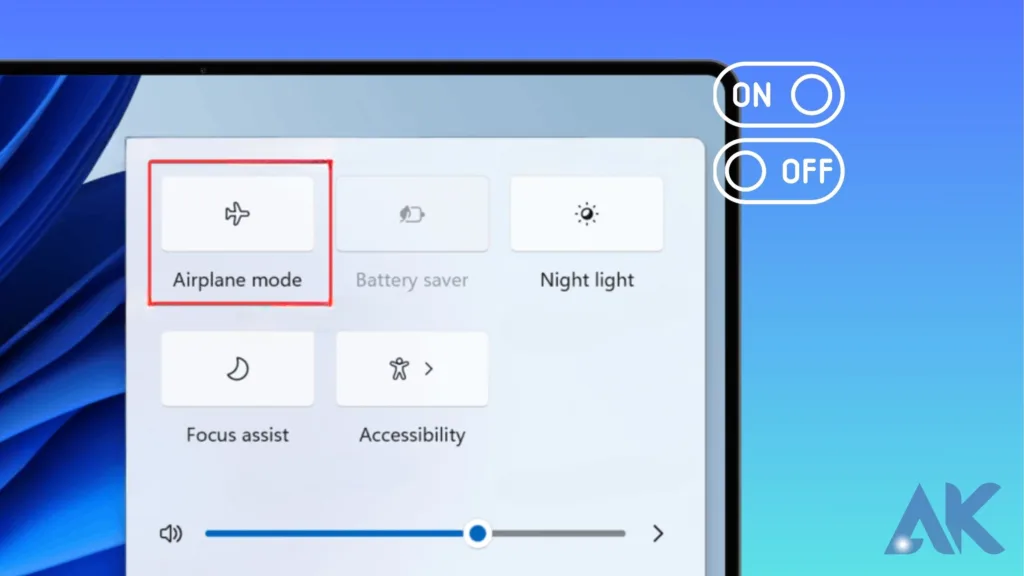
Putting your Windows 11 PC in airplane mode and backing off again is a simple solution if your WiFi keeps disconnecting. It will turn off and then turn on all of your device’s radio components, such as WiFi, Bluetooth, and so forth. This is the way you do things.
1. To access the Action Center, use the keyboard shortcut “Windows + A” on Windows 11. Click the “Flight mode” or “Airplane mode” toggle here. It’s going to turn off WiFi.
2. After a little while, switch it off and see if your Windows 11 computer’s WiFi keeps disconnecting.
Forget and Reconnect to WiFi Network
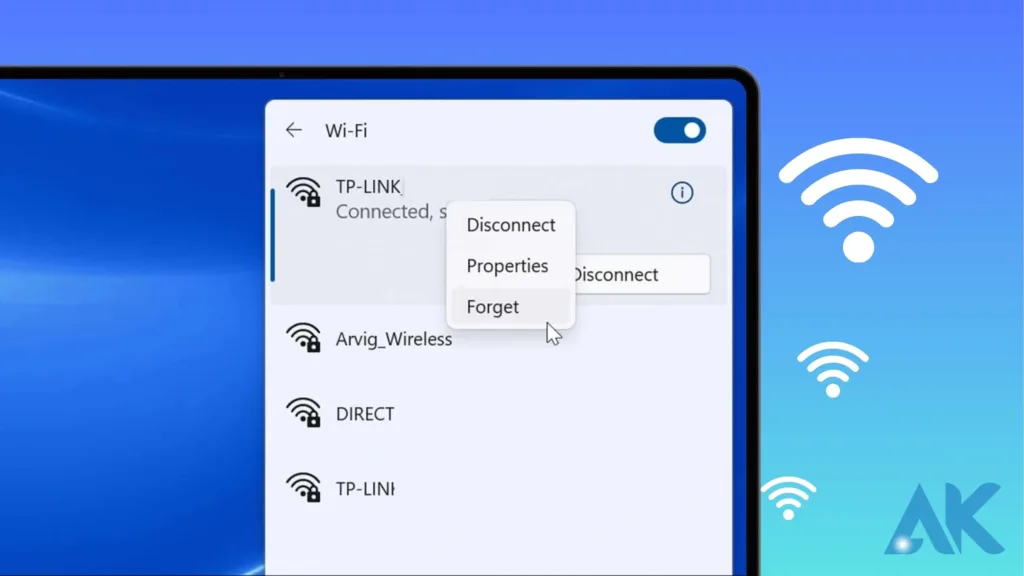
Reconnecting to the WiFi network after forgetting it is another method to resolve the Windows 11 WiFi keeps disconnecting issue. To do this, take the actions listed below:
1. Click the arrow icon next to WiFi to open the Action Center by pressing “Windows + A.”
2. Select “Forget” from the menu by right-clicking on the WiFi network you typically connect to. This procedure will unsave the WiFi password and disconnect your Windows 11 PC from the network.
3. Reconnect to the same WiFi network and input the password after a minute or two. Check to see whether the WiFi keeps disconnecting at this point.
Connect Automatically to WiFi Network
Occasionally, the PC may not connect to the WiFi even when it is within range because the automatic connection setting is off. Take the actions listed below to set up your computer to connect to WiFi networks automatically.
1. Use the shortcut “Windows + A” to launch the Action Center. Here, select WiFi by clicking the “arrow” button.
2. Right-click on the network at this point to select “Properties.” It will cause the Windows Settings program to display the WiFi properties.
3. Check the box for “Connect automatically when in range” from the WiFi settings screen. That is all. Your Windows 11 PC will now automatically establish a connection to your WiFi network.
Set WiFi Network to Private
The problem on your Windows 11 PC can be coming from a different set of firewall and network settings if you have your home WiFi network set to “Public.” Here’s how to resolve the Windows 11 frequent WiFi disconnection issue and ensure that your WiFi connection is set to private.
1. To access the Action Center, use the keyboard shortcut “Windows + A.” Click the arrow icon that is next to the WiFi now.
2. Next, choose “Properties” from the menu by doing a right-click on the WiFi network.
3. Select “Private” as the network profile type under WiFi settings on the Windows Settings screen. That’s all there is to it. You’re done now. Check to see if the WiFi disconnecting problem is still present.
Enable WLAN AutoConfig Service
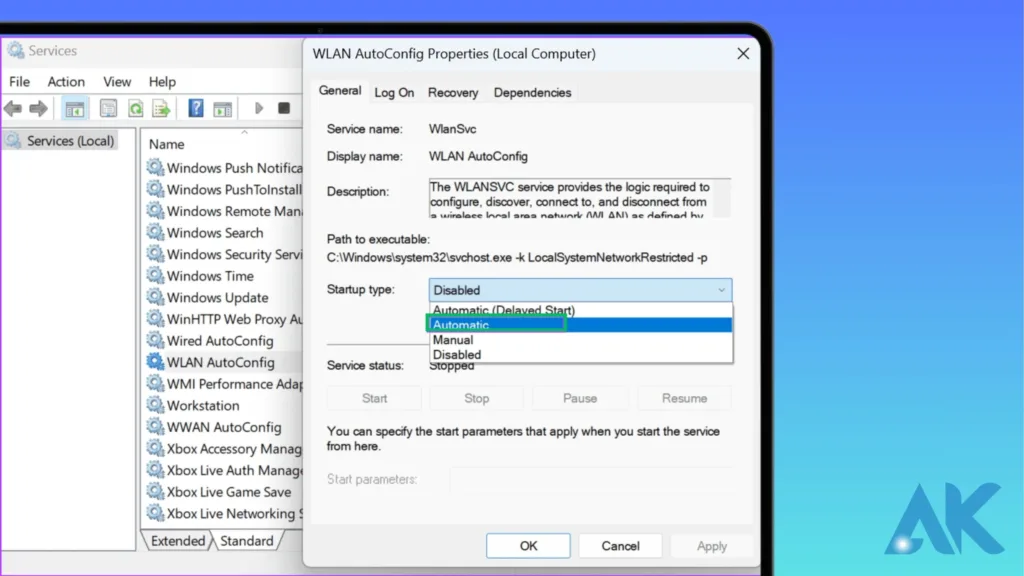
In Windows 11 WiFi keeps disconnecting. WLAN Autoconfigure is a service that manages all things WiFi (wireless networks). In the event that the service is configured as disabled or automatic (delayed), your Windows 11 PC may experience persistent WiFi disconnections. Here’s how to make sure the service is set up correctly, then.
1. Press the keyboard shortcut “Windows + R” to open the Run window. Enter services. MSc after typing it. It’ll cause the Services window to open.
2. After that, locate the “WLAN Autoconfigure” service by scrolling down. To open it, double-click. To immediately enable the service, select “Automatic” under the Startup type and click “Start.” Once you’ve clicked OK, you’re finished. You can now restart your Windows 11 PC to see if it resolves the WiFi disconnection issue.
Update the WiFi Driver
The next step is to upgrade the WiFi driver if none of the previously mentioned fixes resolve the problem. It’s most likely that driver incompatibility is the cause of your Windows 11 WiFi disconnections. This is how you approach it.
In order to access the Quick Menu, press “Windows + X.”. Open “Device Manager” from here.
2. Next, locate your WiFi adapter by expanding the “Network adapters” section. When you do a right-click on it, choose “Update driver.”
3. You must select “Browse my computer for drivers” from the screen that pops up.
4. Next, select “Let me choose from a list of available drivers on my computer” by clicking on it.
5. Lastly, choose the driver that works best with your WiFi adapter. For instance, I have selected the Realtek WiFi adapter because that is the brand I use. Try some other drivers on the list as well if you are unable to get this trick to work. Ultimately, press “Next” to implement the modification.
6. Windows 11 will reinstall the WiFi driver, which should likely fix the problem where Windows 11 wifi keeps disconnecting. Restarting the computer is advised after updating the drivers.
7. Update the WiFi driver on Windows 11 using a third-party driver tool if the problem persists even after you have reinstalled the driver. To install the most recent driver straight from the manufacturer’s website, I recommend using IObit Driver Booster.
Adjust the WiFi Power Management Settings
In order to conserve battery life, Windows 11 wifi keeps disconnecting and occasionally puts some system services, such as Bluetooth and WiFi, to sleep. You should check your Windows 11 WiFi’s power management settings if it keeps disconnecting. This is the way you can change it.
1. On your Windows 11 PC, press “Windows + X” to launch the Quick Links menu. Open “Device Manager” now.
2. In this instance, open the section labeled “Network adapters,” right-click on the WiFi adapter, and choose “Properties” from the context menu.
3. Next, select the “Power Management” tab and deselect the checkbox labeled “Allow the computer to turn off this device to save power.” By doing this, Windows 11 won’t switch off the WiFi adapter in order to conserve battery life. Press “OK,” then restart your computer. Check to see if the Windows 11 WiFi disconnection problem has been resolved.
Change Power Plan Settings
If you still have trouble connecting to WiFi on Windows 11, you can try adjusting the power plan options. It will enable your PC to give the WiFi adapter its best possible performance. The actions to take are as follows.
1. To start, type “Power plan” by pressing the Windows key once. You will now be taken immediately to the Control Panel when you select “Edit Power plan” from the search results.
2. Select “Change advanced power settings” after that.
3. Select “Wireless Adapter Settings” from the pop-up box that now appears on your screen, and set it to “Maximum Performance” for both running on battery power and when connected to a charger. Press Apply -> OK to validate the modifications.
4. After you restart your Windows 11 computer, the WiFi connection should not be lost too often.
Reset Network Settings in windows 11 wifi keeps disconnecting
You need to reset your Windows 11 PC’s network settings if nothing else appears to be working. All of the outdated settings, policies, and cache will be flushed and renewed using this technique. That might be the simplest way to resolve windows 11 wifi keeps disconnecting problem.
1. To access Windows Settings, use the shortcut “Windows + I.” Next, select “Network & internet” from the sidebar on the left, then scroll all the way to the bottom. Select “Advanced network settings” from this menu.
2. After that, select “Network reset.”
3. On the following page, select “Reset now” in the end. Reinstalling your network drivers and restoring your internet settings to their original state will result from doing this. After that, restart your Windows 11 computer to see if the problem of your computer frequently losing WiFi is still present.
4. Type “cmd” after pressing the Windows key once if the problem hasn’t been fixed. Click “Run as administrator” in the right pane now to launch the elevated Command Prompt.
5. Type each of the following commands one at a time in the Command Prompt window. Restart your Windows 11 computer after that, and your WiFi ought to continue to be connected to it this time.
Run Network Troubleshooter
Lastly, try using the Internet troubleshooter to allow windows 11 wifi to keep disconnecting. Attempt to identify and resolve the WiFi disconnection issue on your computer if all other attempts have failed. It functions fairly well and automates the majority of the fixes listed above. This is the last fix that you should attempt.
1. To begin, type “troubleshoot” by pressing the Windows key once. Open “Troubleshoot Settings” after that.
2. Next, in the settings panel, select “Other troubleshooters.”
3. Next, select “Run” next to “Internet Connections” to launch Windows 11’s network troubleshooter.
4. After you follow the directions on the screen and respond to a few questions, Windows 11 will attempt to resolve your computer’s WiFi disconnection problem.
Conclusion
The article provides ten possible solutions to fix WiFi disconnections on windows 11 WiFi keeps disconnecting computers. These solutions range from simple ones like turning off airplane mode to advanced ones like updating drivers.If the WiFi disconnection problem persists, you can update the WiFi driver by pressing “Windows + X” and opening “Device Manager.”. This will reinstall the driver and resolve the issue. If the problem persists, you can update the WiFi driver using a third-party driver tool, such as IObit Driver Booster.
To conserve battery life, you can adjust the power management settings on your Windows 11 wifi-disconnecting computer by pressing “Windows + X” and selecting “Edit Power Plan” from the search results. This will enable your PC to give the WiFi adapter its best possible performance.
FAQS
Why does my Windows 11 keep losing Wi-Fi connections?
Disconnection of your WiFi might also be caused by issues with the network card. Issues with DHCP and TCIP: Your system may occasionally misunderstand TCIP and DHCP settings as a result of connecting to several WiFi devices. As a result, WiFi problems arise in Windows 11.
Does Windows 11 have Wi-Fi issues?
Resetting your Wi-Fi usually fixes Wi-Fi problems with Windows 11. Take this course to get that: Network Reset may be found under Settings > Network & Internet > Advanced Network Settings.
For a variety of reasons, your Windows 11 machine could not have a Wi-Fi connectivity choice. This problem may have hardware problems, corrupt Wi-Fi drivers, or even Windows OS problems as possible reasons. Moreover, you can experience frequent Wi-Fi connection dropouts.
Why does my Wi-Fi keep disconnecting frequently?
Obstacles, a short range, or even interference from other Wi-Fi networks and electronic gadgets might cause a weak Wi-Fi signal. You’re probably attempting to do too much with too little when your network is crowded. You need to either reduce your internet usage or improve your internet package in order to fix it.